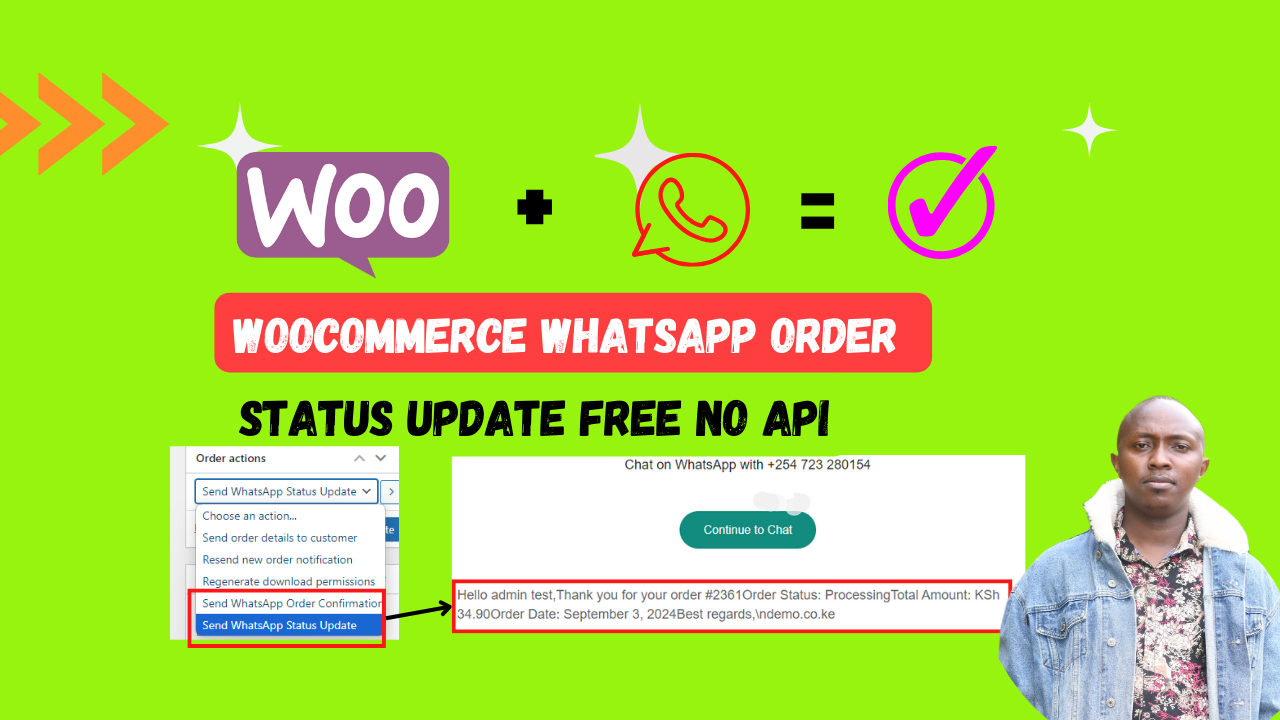
How to add WooCommerce “NEW” badge on recent product.

advert

The “NEW” badge on WooCommerce will notify customers that your product is new and give them a reason to buy now! This video will show you how to use this new feature and make more sales.

Currently the only available badges in WooCommerce is “out of stock” and ” sales” badge. In my previous post we gotten the idea on how to add more badges to your website.

  1. How to Display the Discount Percentage on the Sale Badge in WordPress WooCommerce website
  2. Hot to add WooCommerce Display Fixed Saving Amount On Sale Products

Today learn how to add “NEW” badge to your ecommerce website.

Plugin needed: Code snippet.

Copy and paste the code.

/**
* Author: Thiarara
* Version: 1.1 
* license: Free GPL
* Topic: WooCommerce "NEW" badge on recent product.
* Email support: contact@thiarara.co.ke
 * Snippet Name: WooCommerce "NEW" badge on recent product.
 * Snippet Author: Thiarara.co.ke
 */
// New badge for recent products
add_action( 'woocommerce_before_shop_loop_item_title', 'new_badge', 3 );
          
function new_badge() {
   global $product;
   $newness_days = 30; // Number of days the badge is shown
   $created = strtotime( $product->get_date_created() );
   if ( ( time() - ( 60 * 60 * 24 * $newness_days ) ) < $created ) {
      echo '<span class="new-badge onsale">' . esc_html__( 'NEW', 'woocommerce' ) . '</span>';
   }
}

You can also customize your badge with these simple CSS code:

Ribbon Badge:

/* RIBBON STYLE */
.woocommerce ul.products li.product .new-badge.onsale {
	background: #ffcc00;
	top: .5em;
	z-index: 10;
	right: auto;
	color: #000;
	font-weight: 700;
	text-transform: uppercase;
	font-size: 0.9em;
	border-radius: 0px;
	min-width: 60px;
	padding-left: 19px !important;
}
span.new-badge.onsale:after {
	border: 5px solid #ffcc00;
border-color: transparent transparent #ffcc00 #ffcc00;
	border-width: 9px 6px;
	position: absolute;
	right: -10px;
	bottom: 0;
	content: '';
}
span.new-badge.onsale:before {
border: 5px solid #ffcc00;
    border-color: #ffcc00 transparent transparent #ffcc00;
    border-width: 9px 6px;
    position: absolute;
    right: -10px;
    top: 0;
    content: '';
}
span.new-badge.onsale {
min-width: 60px;
-moz-transform: rotate(90deg);
    -webkit-transform: rotate(90deg);
    -o-transform: rotate(90deg);
    -ms-transform: rotate(90deg);
    transform: rotate(90deg);
}

Circle Badge:

/* CIRCLE STYLE */
.woocommerce ul.products li.product .new-badge.onsale {
	background: #ffcc00;
	right: auto;
	color: #000;
	font-weight: 700;
	text-transform: uppercase;
	font-size: 0.9em;
	border-radius: 0px;
	border-radius: 999px;
	min-width: 3em;
	min-height: 3em;
	line-height: 3em;
	padding: 0;
	position: absolute;
	text-align: center;
	top: .5em;
	left: .5em;
}

For you to be able to add the CSS, You will to head to WordPress admin dashboard Menu, On appearance, select customization. upon opening, Select additional CSS and paste your code. Follow attached tutorial for more guidance.

You may also like these one: WooCommerce Order Status ( Autocomplete paid WooCommerce orders)

advert:

Support us:

0
Would love your thoughts, please comment.x
()
x

Login To Access Code Snippet:

Stay UpTo Date with Latest Post And news: